Blogging ke liye sabse achha platform wordpress hai. Kyuki ise istemal karna bahut hi asan hai. world me 25% log wordpress ka istemal karte hai apne website ke liye.
WordPress Ek paid service hai iske liye hosting purchase karni padti hai, hosting ke liye sabse achha service hostgator ki hai. Aur hostgator bahut sare hosting plan offer karti hai. agar aap sasta me achha hosting khoj rhe hai to hostgator ka shared baby plan choose kar sakte hai ye aapko 400-500 Rs monthly aa jayega . hostgator ka page loading bhi bahut fast jo website ke liye bahut jaruri hai. Sabse badi bat hostgator ka customer care se aap hindi me bat kar sakte hai.
Also read – Facebook Ac Hack Kaise Kare – 100% Work 2016 Easy
Agar aapne hosting purchase kar li hai to aapko Apna Domain Registration karna padega agar aap hostgator se hi domain liye hai to iski jarurat nahi hai. But dusre site se domain liya hai to domain wale site me jake Nameserver Update Kar Le. Update Hone Me 24hr lagta hai..
Name sarver update hone ke bad hostgator ka C Panel me wordpress install karna padega uske bad aap wordpress use kar sakte hai .
To cahliye jante hai hostgator ke cpanel me wordpress kaise install karte hai.?
Hostgator me wordpress install karne ka 2 tarika hai
- Manual
- Quick install
- Manual me apko wordpress ke official website me ja ke pahle wordpress software download karna padega uske bad aap manually ise install kar sakte hai.
- Quick install me hostgator ke c panel me sirf form fill- up karna hai. I mean sirf step by step apko apna website ka information dalna hai. Aur 5 minute ke andar install ho jayega. Isliye mai to kahunga aap quick install hi kare.
Also read – Free Me Google Se Paisa Kaise Kamaye
Hostgator ke c panel me wordpress ko quick install kaise karte hai step by step
Sabse pahle Hostgator account ke cpanel me login kre, Scroll kare aur niche dekhe
Wha pe software and service ka section hoga usme quick install me click kare,
- software/Services section >>> quick install
![]()
Ab jo nya page open hoga us page ke left side me dekhe popular install ke niche wordpress likha hoga
- wordpress me click kare
- install wordpress me click kare
![]()
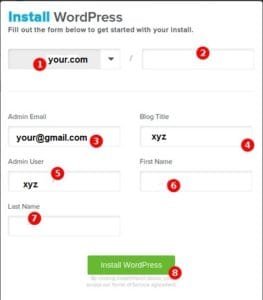
Form ko fill-up kare
- apna domain name select kare
- yha khali chod de…(automatic le lega)
- Email Id Dale
- Blog ka title dale (as your wish)
- Apna user name dale (kis nam se aap login karenge)
- Apna pahla name
- Dusra nam
- Install WordPress Pe Click Kare

Kuch time wait kare, install complete hone ke bad apka wordpress user name and password right side upar show hoga, jaisa image me diya hua hai,,,ya fir jo email id dale hai usme check kare user name ur password mil jaye wha pe wordpress login ka link bhi hoga,,
![]()
Waise login karne ke liye is type ka link hoga
Jaise – http://yourdomain.com/wp-admin/
Ab apka wordpress install ho gya agar aap dns record aur name server update nahi kiye hai to use 24hr ke andar kar le
Install karne me koi paresani aye ya blogging sambandhit koi sawal ho to comment se puche,

From my experience hostgator is the best service provider. Recently I host my personal website 123funnyjokes.com from hostgator. I am very impressed by the service of hostgator. And I will definitely host my next wordpress website from hosgator by the help of this post. Thnx for share it.